Thursday, March 22, 2007

Whipped Shortbread Cookies


These easy cookies are simply wonderful! I decorate them with red or green sugar or with candied cherries for Christmas, (and this year I dipped some in white sugar and flattened them with a snowflake-design cookie stamp), but I make them any time of year and they can be dipped in plain sugar or multicolored candy sprinkles. Pastel sugars would be pretty for Easter.

WHIPPED SHORTBREAD

3 cups butter, softened
1 1/2 cups confectioners’ sugar, sifted if very lumpy
4 1/2 cups flour
1 1/2 cups cornstarch
Colored candy sprinkles and/or halved candied cherries and/or red and green colored sugar

Using a heavy-duty mixer, beat butter on medium speed until light and fluffy. Gradually add dry ingredients, beating constantly until well blended. Roll dough into 1-inch balls (dust hands with additional cornstarch if necessary); dip balls in either colored candy sprinkles or colored sugar. Place balls, decorated side up, on ungreased cookie sheets. Press each ball lightly with a fork. (If you wish to decorate cookies with cherries, do this: Do not dip balls in colored sprinkles or sugar. Instead, place plain balls on cookie sheet and press lightly with fork. Then top each cookie with a cherry half.) You may wish to do an assortment and trim some cookies with candy sprinkles, some with colored sugar, and some with cherries.

Bake cookies at 300º for 20 to 22 minutes, or until cookies are set but not browned.

Yield: 16 dozen cookies

This is a very big recipe, but it is very easily divided in half (or even in thirds) if you wish to make a smaller batch. It is so easy, but produces many beautiful cookies quite quickly.

Wednesday, March 07, 2007

Lovely ornaments to craft


Here are some of my very favorite ornaments. I saw some similar ones years ago in an outdoorsy catalog and decided to try making my own. If you'd like to do the same, keep an eye out in your area for the tiny hemlock cones. I gather mine when we're out for walks, and store them in a tin until I'm ready to use them for crafting.

Here's what you need:


* Clear glass ball ornaments

* Hemlock cones

* Artificial snow (this is the flaky stuff that comes in a bag)

* A funnel or a sheet of paper

* Ornament hangers or thin red ribbon for hanging

Carefully remove the tops from the glass ball ornaments. If you have a small funnel , insert the funnel tip in the top of the ornament and pour in some of the artificial snow. (If you don't have the right size funnel, just roll up a sheet of paper to create a funnel.) Don't fill the ball with snow; just fill it 1/4 or 1/3 full. Remove the funnel and drop some hemlock cones into the snow. Use as many as you like; I think I usually use at least 8 to 10. Sometimes you have to sort of squeeze the cones to get them through the ornament opening. I find it works best to put them in upside-down -- that is, the "stem" end first.

Carefully replace the hanger top on the ornament. Add an ornament hanger or a loop of thin red ribbon for hanging.

These look lovely on your tree and also make wonderful gifts!

Friday, March 02, 2007

A vintage mini-stocking


I was probably in my early teens when I received this little stocking from my grandmother, tucked into a package along with a gift of clothing. There was money folded up inside the stocking -- probably a dollar or two -- and maybe a tiny Christmas sachet, if I remember right. Thankfully, I kept the little stocking in a safe place -- so I still have it today and it has a special place on my tree each year. Isn't it adorable?

Wednesday, February 28, 2007

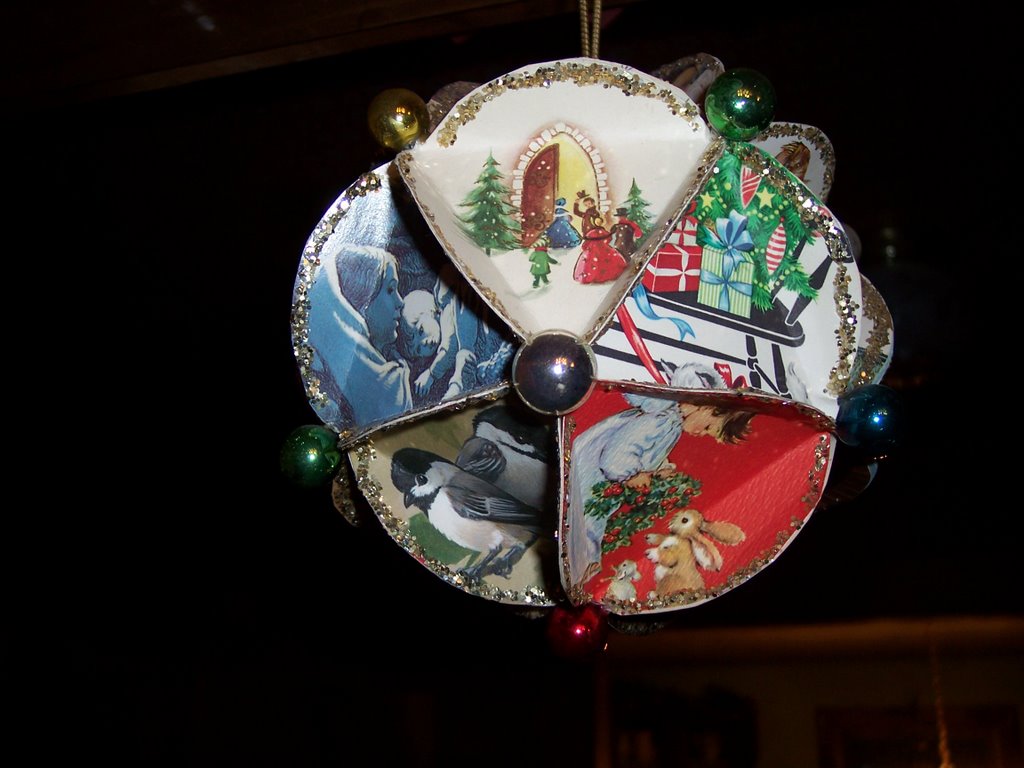
A Christmas Card "Kissing Ball"


Yes, I know a kissing ball usually incorporates mistletoe or greens of some sort. However, in our family we hang this colorful decoration made from old Christmas cards in a doorway and we call it a "kissing ball". One of the kids started calling it that, and the name stuck. My husband persists in treating it as if it were mistletoe.

This project is a tiny bit time-consuming in waiting for glue to dry, etc. but it is very easy and a lot of fun to do.

You will need: Old Christmas cards
A compass or a 3-inch jar lid (for tracing circles)
A pencil or pen
Ruler
Scissors
Mucilage-type glue (the kind with the spreader top)
Paper clips
Glue stick
Glitter
Miniature glass Christmas ballsTacky glue
Heavy gold (or other) cord for hanging ball

To begin, draw a three-inch circle or two on the back of a Christmas card, and cut these out. These will be your templates. It's a good idea to have more than one, because they get a bit worn down and out of shape if you keep using the same template over and over.

You need to also draw an equilateral triangle that just fits inside a 3-inch circle, and cut that out. This triangle will be your template for folding the circles later.


Next, using your circle templates, draw 20 three-inch circles on Christmas card fronts. Try and center the card's picture (or the part of the picture you are using) in the circle. You may be able to get more than one circle per card, depending upon the design. Cut out the circles.

The next part sounds tricky, but it really isn't that difficult. Once you begin, you will understand how it works.
First, make the top of the ball. This takes 5 circles. Using your triangle template, trace a triangle on the back of each circle, with the point uppermost. You will want to make sure that your design is right side up, with the triangle's point at the top.

Now, fold along the lines you just made. Crease them well. What you will have is a triangular design framed by half-circle flaps on all three sides.


Now it's time to glue. Take the first two circles and place them side by side with the points of triangles next to each other at the top. Apply the mucilage-type glue to the back of two adjacent side flaps and glue them together. Secure with paper clips which will hold the flaps together until they dry. Continue until all 5 pieces are glued together. Then glue the two remaining side flaps together. You will see that this forms a cap-like piece, or maybe an upside down bowl. Paper-clip the last two glued flaps and set the piece aside to dry.


Next, make the bottom of the ball with 5 more circles. This time, trace your triangle so that the point is at the bottom of your design. Again, be sure the design is right side up, but with the triangle's point at the bottom. Fold and crease as before. Glue as for top, but this time you glue them side by side with the points of triangles next to each other at the bottom. Paper-clip the flaps together as you glue. Finished bottom piece will resemble a bowl. Set aside to dry.

Now make the middle section, using the remaining 10 circles. This time you will trace 5 triangles with the points up (design right side up) and 5 triangles with the points down (again, with the design right side up). Fold and crease as before. As you have probably guessed, the positioning and gluing of the middle section is different from the top and bottom. Place a point-up triangle next to a point-down one, and so on, alternating between the two. Glue and clip adjacent flaps as you go. At the end, glue and clip the remaining flap of the last piece to the unglued side flap of the first piece. Set aside to dry.

(Are you thinking this is a lot of work? It's simple work, though, and I promise the finished product will be very pretty.)

When all three pieces are dry, remove all of the paper clips. Don't put them away, though -- you'll need them again.
Now, glue the bottom flaps of your top piece to the top flaps of the middle section, paper-clipping as you go. And then glue the top flaps of the bottom piece to the bottom flaps of the middle section, again paper-clipping as you go along. Set the completed ball aside to dry.

When it's dry, now is the time to add glitter. You can use whatever color glitter you like. I usually use gold or silver, but one time, for an elderly aunt who collected Santas, I used all Santa cards for the ball and used red glitter. Anyway, to add glitter, hold the ball over a disposable pie pan or other throwaway container. Use the glue stick to add glue to each flap of the completed ball, and then sprinkle the gluey surface with glitter. Shake off excess.


Now, for the finishing touch. You've probably noticed that there are openings where the folded circles don't quite meet. You are about to fix that! For each of these openings, dip the hanger end of a miniature Christmas ball in tacky glue. Carefully insert these glued ends into each opening except for the opening at the top of the ball.
Make a loop of cord to use as a hanging loop. Tie the cord ends in a sturdy knot. Dip the knot in tacky glue and carefully insert the knot into the opening at the top of the ball. Set the ball aside until all the glue is dry.

Hang your new decoration in a hallway, window, or from a ceiling fixture -- and enjoy its festive sparkle!


Monday, February 26, 2007

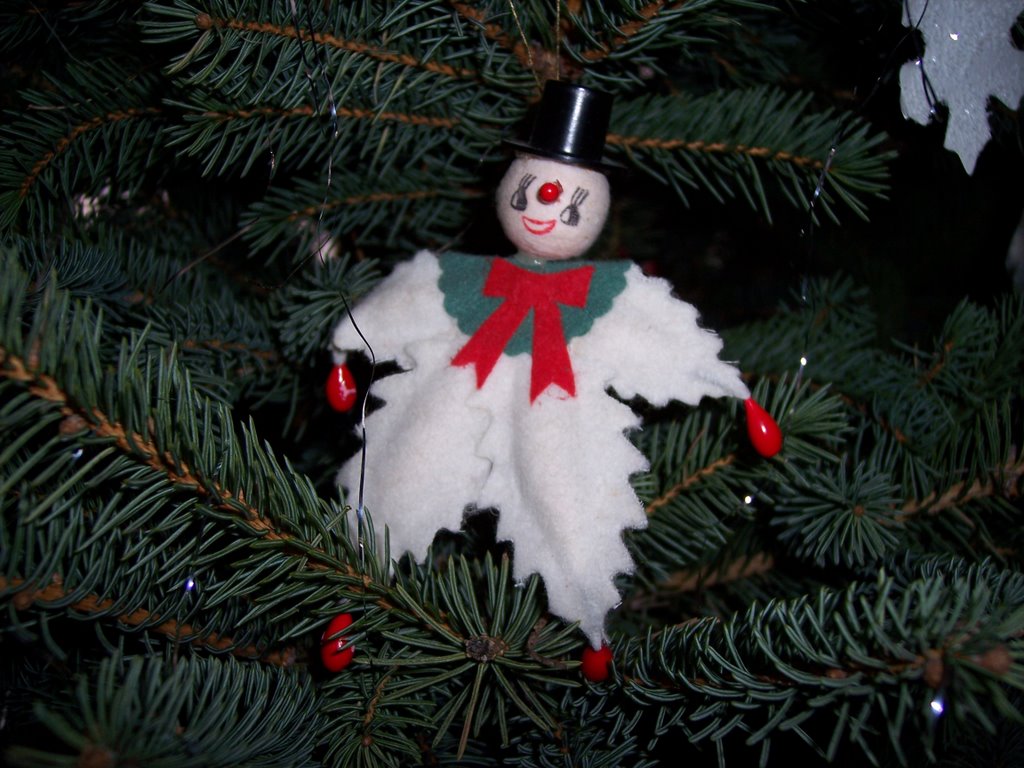
A favorite felt snowman ornament

I've mentioned before about the treasured antique ornaments given to me by a great-aunt. Still tucked into the ancient brown shoebox in which she gave them to me, they include colorful, tarnished glass balls, shiny cardboard reflectors to place on the old-fashioned colored lights, and some cute felt ornaments. 

There are two of these snowmen, and I love them. They are made out of white felt in approximately the shape of a snowflake. Each snowman's head is a wood ball with painted features and a three-dimensional red nose, and they wear black top hats. They sport green collars and have red "berries" for hands and feet.  

Right now, the winter/Valentine tree is still up -- we put it up for our family Christmas which we celebrated on Feb. 17. I've trimmed it with hearts, snowflakes, icicles, a sled or two, etc. -- and these two snowmen. 

 I feel so thankful to have had such very special ornaments passed down to me!

Saturday, February 24, 2007

Holly Leaf Cookies


These very special cookies are a favorite for brightening up a cookie tray! I found this idea years ago in a quaint, old-fashioned New England cookbook. However, I didn't care for the cookie recipe itself. Fortunately, my good friend Marilyn shared with me her mother's special recipe for cut-out cookies. Almond and orange extract, along with vanilla, give these cookies their wonderful flavor. I combined Fran's recipe with the holly leaf idea to produce some very pretty, retro-looking cookies that also taste terrific! Enjoy!

HOLLY LEAF COOKIES

1/2 cup solid shortening
1/2 cup (1 stick) real margarine
2/3 cup sugar
1/2 teaspoon salt
1 teaspoon almond extract
3/4 teaspoon vanilla
3/4 teaspoon orange extract
2 eggs
2 1/2 cups flour
Green food coloring
Cinnamon red-hot candies
Green decorating sugar

Combine the shortening, margarine, sugar, salt, flavoring and eggs in a large mixing bowl; beat well. Add flour and mix well. Mix in enough green food coloring to tint dough light green. Cover dough and chill thoroughly.

On a floured surface, roll a small portion of the chilled dough about 1/4-inch thick. Cut with a holly leaf cookie cutter. Place leaf shapes on a cookie sheet lined with parchment paper. Trim each cookie with 1 or 2 cinnamon red-hot candies for holly berries, placing the candies at the stem end of the holly leaf. Sprinkle each cookie with green decorating sugar.

Bake in a preheated 375º oven for 8 to 10 minutes. Remove to wire racks to cool. Repeat process with remaining dough.

Yield: 2 to 3 dozen cookies, depending on the size of the cookie cutter used.

Friday, February 23, 2007

A Simple Ribbon Board ...

... to display Christmas cards and other paper treasures!


As I've mentioned, I have a nice collection of vintage and antique Christmas cards, all given to me over the years -- oddly enough, by people who knew I used old Christmas cards in art projects with children in school and Sunday School. Many of these cards probably have no real value -- some of them have the backs removed, and many have had the signatures cut out. But they are valuable to me because they are so beautiful. For years I wanted to display them, but couldn't think how -- I didn't want to damage them further with tape or tacks or staples. I inherited a nice glass-topped desk, and displayed some of the cards under the glass. But I still wished I could display more of them -- to me, no matter how lovely a collection may be, if its beauty can't be shared with others, it's really not worth having. I know people who have treasures like this squirreled away in shoeboxes, and it's absolutely ridiculous because no one -- including the owner of the collection -- can enjoy them there.

So I came up with the idea of using a large ribbon board to display my vintage card collection. I made a very, very simple one, and it has worked well for quite a few holiday seasons now. I took a full sheet of foam core board and covered it with fabric. (You could use a holiday fabric, but I felt that a solid color would be the best background for the colorful variety of my cards, so I chose a plain dark green fabric.) Very simply, I cut the fabric a couple of inches larger than the board all around, placed the board face down on the fabric, neatly wrapped the excess fabric to the back of the board, and hot-glued it in place. To hang the board, I made a loop of festive red/green holiday cord, and hot-glued that to the back as well. Next, I took lengths of red satin ribbon and tacked them diagonally across the board one way and then the other, gluing the ends of the ribbon to the back of the board. At the places on the front where the ribbons intersected, I used shiny brass tacks to hold the ribbons in place. All those ribbons made nice secure spaces in which to tuck my cards. I hung the board in my front entryway and it holds a great many of the cards in my collection -- the vintage cards are much smaller than the cards we send today.

This card-filled ribbon board makes me happy every time I walk by it!
In fact, the idea worked so well for me that I made a second ribbon board in neutral colors -- using unbleached muslin for the fabric and ivory ribbon -- to hold the paper treasures I've collected for other seasons as well. I know that ribbon boards are not a new idea, but I haven't seen any just like mine. I hope someone else will try this idea for a special collection of treasured paper items!

Tuesday, February 06, 2007

Juice-Can Lid Ornaments


Today's been a tough day, and I'm rewarding myself with a post on my Christmas blog. Before we took our Christmas tree down, Mr. T took a few photos of some of my favorite, mostly homemade, ornaments. I posted this on my regular blog in December, but am going to post it and others again here, with photos this time. So here's the first installment:

Juice-Can Lid Ornaments

The supplies you will need are simple:

* Lids saved from cans of frozen juice/lemonade/iced tea (Lids should be washed and completely dry)

* Scraps of Christmas wrapping paper

* Pen or pencil

* Decorative holiday cords and trims (Walmart craft department is a great source for these)

* White glue

* Paintbrush

* Clear glitter (optional)

* Ribbon (optional)

* Thin gold cord, hot glue gun/sticks (to make hanging loop)

Place your lid on the wrapping paper and trace around it. Depending upon the pattern of the wrapping paper, you may want to center a motif in the circle you're making. Cut out the circle and glue it to the lid -- the outside of the lid, the side with a nice rim around it. Then use a paintbrush (I like to get the foam type for this) to paint a coat of glue over the picture as well. If you want your ornament to sparkle, this is the time to sprinkle on some glitter. Allow the glue to dry.

Take a piece of decorative cord or trim and glue it around the inside of the lid's rim. If you start at the top or bottom of your motif, you can very easily cover the spot where the ends of the cord meet with a small bow, ribbon rose, or whatever. (As mentioned, Walmart has many different such cords or trims available this time of the year. I have shiny red/gold cord, red/green, blue/silver, etc. I always buy these after Christmas when they are very inexpensive... but the full price is really quite reasonable. Another good source for such cord and trims is Home-Sew or Newark Dressmaker Supply.) Allow the glue to dry.

For the hanging loop, make a loop from the thin gold cord and knot the ends together. Use hot glue to glue the knot to the center top on the back of the juice can lid. Let dry and hang on your Christmas tree!


Thursday, January 18, 2007

The story of my Christmas hutch


Toward the end of November, we went out for a spur-of-the-moment lunch with some friends after church. As we enjoyed a casual, relaxing meal at a local seafood place, we chatted about our plans for the upcoming holidays as well as other happenings in our lives. Our friends have their home for sale and are planning to downsize to a smaller place. They mentioned that they had sold many of their things but that they still had a few larger items to get rid of. One of these items was a handmade hutch.

I have always wanted a hutch. We have a pine corner cupboard (also handmade) in our dining area, but it's packed to the gills, and I've always wished for a hutch as well. My husband has the skill and talent (but not the time) to build one, so I had pretty much resigned myself to not having one. As Elizabeth George says in A Woman After God's Own Heart, "If God doesn't provide it, you didn't need it." When our friends mentioned that they only wanted $125 for the hutch, I became cautiously optimistic. That was certainly within our price range, and my husband was interested too. The deciding factor would be its dimensions. Our dining area is fairly small, and the portion of wall space we could allocate to a piece of furniture was limited. We said we would think and pray about it and perhaps go and look at the hutch.

Later that week, my friend called with the dimensions. We measured the intended space and found it perfect. We set up a time to go look at the hutch. It was exactly what we wanted! Not too big, not ornate -- very simply made and a near-perfect match for our corner cupboard. The extra-special blessing was when my friend said, "I want you to take it before Christmas. You will have so much fun decorating it for the holidays."

And indeed I did! I plan to use the open shelves as a showcase for seasonal decorations I've collected and change them with the seasons. But in my heart it will always be my "Christmas hutch" -- a very special Christmas gift that God provided for me in 2006!
 
(Note: photo at top is from 2010.  It has varied often since then.)

Tuesday, January 16, 2007

Golden Apricot Cake


Of all the goodies I made to give away this year, these little cakes were the one everybody mentioned. I just typed out the recipe for an aunt who requested it, and added it to my personal cookbook, so it seemed an opportune time to add it here in the Christmas kitchen. Of course this need not be reserved for Christmas; I plan to make more for Valentine gifts.

GOLDEN APRICOT CAKE
1/2 cup water
1/2 cup sugar
2 cups dried apricots, quartered
1 3/4 cups flour
2 1/2 tsp. baking powder
1/2 tsp. allspice
1/2 tsp. salt
3/4 cup unsalted butter
1 cup sugar
3 eggs
2 tsp. vanilla
1 cup raisins (either dark, golden, or a combination of both)
1 cup chopped dates
Grated rind of 1 orange

1/2 cup chopped walnuts
1/2 cup slivered almonds

A day ahead, combine the water and 1/2 c. sugar in a small saucepan; bring to a boil and boil 1 minute. Remove from heat, pour over apricot pieces; stir and let stand, covered, in a cool place overnight. (I put them in the fridge.)

Next day, sift dry ingredients together onto wax paper, then return them to sifter and sift again. With electric beater, cream butter and 1 c. sugar until light. Add eggs one at a time, beating well after each; beat in vanilla. Toss raisins, dates, orange rind and nuts with 2 Tablespoons of the flour mixture. Fold the flour, the fruits/nuts, and the apricots (lifted from their syrup with a slotted spoon) into the creamed mixture just until well distributed.

Heat oven to 350º. Turn batter into a well greased and floured tube or Bundt pan, or use smaller pans. I use about 9-10 small loaf pans. Bake tube or Bundt pan about 1 hour 15 minutes or until golden brown and beginning to pull away from sides of pan. (Obviously, bake smaller pans for a shorter time. I think my small loaves take about a half hour.)

If using large pan, let cake cool in pan for about 30 minutes, then turn out on wire rack to finish cooling. For the small pans, let them cool 5 minutes or so before turning out on rack to finish cooling.

This wonderful recipe is from Cook & Tell December 1988. (The only change I made was to increase the raisins and dates a bit and to use fresh orange rind rather than candied peel. But do what you think best -- if you prefer candied peel, then you need a total of 2 cups raisins/dates/peel. ) I love to make this in little loaf pans to include in gift baskets for friends and neighbors.

Sunday, January 14, 2007

My Christmas Hutch

Here's a photo of my new-to-me hutch all decorated for Christmas! This was how my hutch looked for most of the Christmas season. (If you want a closer look, you probably know that just by double-clicking on the photo you can bring up a much larger version of it.) 

On the bottom shelf is a manger scene with the wooden stable made by my dad. I am so excited to have a nice place to display this! The figures are nothing special, and I hope at some point to replace them with some a bit nicer. 

On the second shelf I have displayed 3 of my Gooseberry Patch Christmas-themed books. I don't own all of these, but I do have quite a few. (I've gotten several of them for free because a craft or recipe of mine was published in them! Fun!) Also on this shelf is a sparkly bottle-brush tree, a plastic reindeer, a cute little papier-mache snowman container, and a sprig of fir from our Christmas tree. Lying in front of the center book is a little painted metal sign reading "Joy to the World." 

 On the third shelf, on the left are 3 little glittery cardboard houses (I love these things!) and a bottle brush tree. In the middle is a cross-stitch Christmas picture I made, and to the right are 2 plastic reindeer and a plastic Santa/sleigh (1950s vintage), partially out of sight. Also out of sight is a sprig of silk holly with a vintage-y red bow. The black objects are lumps of coal with snowmen painted on them. (My hubby put those in my Christmas stocking!) 

On the top shelf are 2 cute snowpeople given me by a friend, and in the center is a lovely cross-stitch made by the same friend. It's Proverbs 31:31, and will probably stay in that place year-round. We had to take it off the wall to make room for the hutch. At each end of this shelf is a little teddy bear, one with a song book and one holding a musical note. We've had these for years and I always like to put them some place in my Christmas decorating. 

So that is this year's Christmas decor for the hutch. I had so much fun putting it all together!

Saturday, January 13, 2007

Welcome to My Christmas Kitchen!


Welcome to my Christmas kitchen!

Come on in! Here's a peg so you can hang up your coat. Leave your boots by the door and put on a pair of cozy slippers. There's cranberry-orange juice mulling and a crackling fire in the woodstove. There's a tin full of Christmas cookies for nibbling on, and more are baking. Golden Apricot Cakes are cooling on the kitchen table, and I'm just now scraping the last layer of Heavenly Delight fudge into a square pan. Sit down and visit awhile!

I've been thinking for a long time now about creating another blog -- one with a specifically Christmas theme. Would anyone be interested in reading about and planning for Christmas all year long? Well, I would, for one -- and I only have to take a look at the busy forums on OrganizedChristmas.com, one of my favorite sites to visit, to come to the conclusion that plenty of other people would, as well.

I love Christmas -- and especially the Reason for Christmas, celebrating the birth of our Lord and Savior, Jesus Christ Himself. I personally love the idea of planning for, preparing for, and thinking about Christmas, all year long. So I've decided to give this a try, for my own benefit if for nothing else. Here's where I'll detail my Christmas planning, stash my Christmas recipes and my craft and decorating ideas. I'll undoubtedly post a few photos and some of my little collection of vintage Christmas cards. I most likely won't post here every day; maybe only once a week or so at first, but in December I'll be here in the Christmas kitchen every day for sure. You're welcome to join me here too!